Thursday, May 6, 2010
My Shadow
A beautifully illustrated version of Robert Louis Stevenson's poem, My Shadow by Glenna Lang. The pictures show a young girl's travels through a dream night scape with her shadow companion. I like this book obviously because of the poem but also because the illustrations, even though they are acrylic paintings, look so much like the effect you get with silk screen printing. Flat areas of colour with no shading. The illustrations also have been criticized because of their flatness and muddling of the concept of shadow casting. I have used it to help show what silkscreen prints can look like and also as a starting point for collage, using coloured papers. I don't know of any picture books illustrations that employ silkscreen as a medium so if you know of one I'd appreciate hearing about it.
Activities:
1. Share the book. Discuss the pictures in terms of media and style. Can you identify shadows? What causes shadows?
2. Identify the features of the pictures in that they are flat areas of colour that fit together. There is no shading to suggest form. Most children will probably determine they were painted.
3. Offer the coloured paper as collage to create images or introduce the silkscreen process to create images that have flat areas of colour and shapes that fit together.
4. Children obviously need prior experience with the silk screen technique and have experimented with it beforehand. A good way of doing this is to use torn paper stencils with the silkscreen and repeated printing with different colours.
Wednesday, February 24, 2010
The Mysteries Of The Harris Burdick
This is my all time favourite picture book! In fact anything by Chris van Allsburg automatically goes into my library - I love everything he does. There is lots of stuff about using this stunning book as a stimulus for writing activities. But the drawings will open a whole new world of exploration for using black and white drawing media.
You can Google the title to find out more but if you don't know this book you need to get out of the cave you have been living in!
Activities:
1. Give children a whole range of graphite pencils to play with. You could challenge them to create as many tones as they can with them from pure white paper to the blackest black they can make.
2. Share the illustrations and talk about them extensively - there are lots of options here.
For example you could discuss what media has been used. How has Chris Van Allsburg shown things in three dimensions? Discuss the pictures in terms of whether they are realistic or not? Talk about how he has made them slightly surreal. Discuss the dreamlike/enigmatic/mysterious quality of them. This list is endless.
3. Challenge students to create a black and white image that tells a story like the images in this book. Can you make an image that uses all the tones you discovered?
Can you make an image that is like a dream? Can you make your image enigmatic/mysterious? Encourage students to use the media all over the surface like the illustrations. This could be part of the discussion. For example: Tell me about how much pencil has been used on the paper. What white spaces are left and what are they for?
4. I have a black and white pencil drawing I have done that I sometimes use with students. While it's not in the same class as Chris Van Allsburg's work, it does give students an idea about making a drawing that fills the space with media and making an image that appears realistic but incorporates the impossible.
Tuesday, November 10, 2009
Cat and Fish by Joan Grant & Neil Curtis
This is a stunning picture book with black and white illustrations by Neil Curtis, that are actually pen and ink but look like relief prints or engravings. It could be the starting point for explorations with pen and ink or printing with children. Neil Curtis has also illustrated another favourite of mine: Nightening. See the book here.
http://www.amazon.com/Cat-Fish-Joan-Grant/dp/1894965140/ref=sr_1_2?ie=UTF8&s=books&qid=1257905933&sr=1-2
Activities:
1. Talk about the illustrations. Identify some of the features of them. Yes they are black and white. They are crisp. There are no middle tones or tones of grey. Look at the pictures in terms of pattern too.
2. I would use this as a starting point for printmaking with children but only after they have had previous experiences with some of the different types of printing. So they would need to have maybe mono-printed at least before playing with any form of relief printing.
3. Lino prints or woodcuts are probably inappropriate for primary age children because of the tools needed and difficulty in cutting. You can get foam/polystyrene sheets which work quite well and children can use any sharp implement to incise them to make a relief block.
4. An alternative could be to offer students black ink and drawing pens and brushes to explore. I would challenge students to see if the can after experimenting, produce crisp images with patterns like Neil has done.
Wednesday, October 28, 2009
Willy's Pictures by Anthony Browne
See the book here: http://www.amazon.com/Willys-Pictures-Anthony-Browne/dp/0763613231
I love all of Anthony Browne's books. I think I have bought all of them. I love his obsession with bananas and gorillas and the surrealist style of illustrations. Children love them too and will relish in finding his hidden symbols. Willy's Pictures is an excellent way to introduce children to some of the more well known paintings from art history.
Activities:
1. Obviously take the time to read the book and look at all the illustrations. This could take quite a while as there are many. Enjoy the changes he has made. You might need to get larger reproductions of the actual paintings as they are quite small in the book.
2. Discuss Anthony Browne's versions of the paintings. You could ask, "Where did he get the ideas from for these pictures?" "Do these paintings look familiar?" Some students may have seen the paintings that Anthony Browne has appropriated. (In the visual arts, to appropriate means to adopt, borrow, recycle or sample aspects (or the entire form) of any art work.)
3. You could choose one art work and develop student's ideas around it to make their own appropriation.
4. Theodore Mandziy - an art teacher in Singapore introduced me to some great ideas for appropriation. He used Michelangelo's painting, The Creation of Adam, with students and the challenge was to give the painting a modern context.
5. With any masterpiece you could challenge students to appropriate the work around a specific concept or with a certain criteria. It could be as simple as changing the colours or as complex changing the context of the image. It could be to change the form. Can a painting become a sculpture?
Tuesday, October 13, 2009
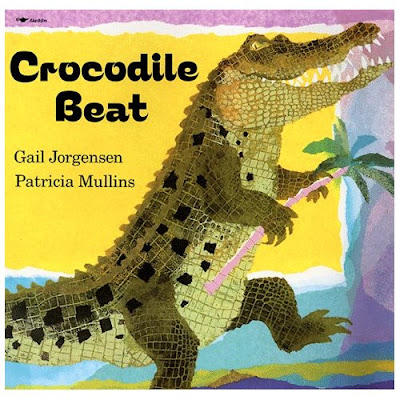
Crocodile Beat by Gail Jorgensen & Patricia Mullins
I love this book and have used it many times. It is an excellent story to read aloud and the pictures are magic. Tissue paper has been used predominantly to create them with some printing. Read more about it at http://www.amazon.com/Crocodile-Beat-Gail-Jorgensen/dp/0689718810
Activities:
1. Share the book by reading it.
2. How have the illustrations been made?
3. Focus on the fact that the artist, Patricia Mullins has torn the paper. Why has she done this? What effect has it created?
4. Usually I always give students the media to play with but with this I don't always. Offer them a selection of coloured tissue papers and PVA glue.
5. They can tear or cut the tissue paper.
6. Sometimes I actually demonstrate saturating the tissue with glue so it gets stuck successfully to the paper. But it is always good to let children experiment and find their own way. Your call.
7. Issue a challenge like: Can you make a scene with tissue paper like Patricia Mullins has done?
Other books to look at that Patricia Mullins has used the same medium: Hattie & The Fox and Shoes from Grandpa.
Wednesday, October 7, 2009
Olivia by Ian Falconer - Charcoal Drawings
Welcome to my first post in what I hope will grow to be a very useful resource for arts educators and people who love quality children's literature through picture books.
You can find out more about this great book at http://www.amazon.com/Olivia-Ian-Falconer/dp/0689829531 and http://books.google.com/books?id=4RQxIJS8IAMC&dq=Olivia+Ian+Falconer&source=gbs_navlinks_s I am not on Amazon's payroll either!
Activities:(The first 4 points I would use with every book unless you set it up in the classroom as a learning centre or choose to share it other than by reading aloud.)
1. ALWAYS, ALWAYS read the book yourself before reading it to children.
2. Introduce the author and title to your students.
3. Read it with enthusiasm and gusto. Change your voice, make it COME ALIVE!
4. Ask some questions about the media used to make the illustrations like:
How has Ian Facloner made the pictures? What materials has he used?
5. If they have never experienced I would then explain to them that some materials (charcoal/paper) are set up in the room for them to use.
6. Stress experimenting and playing with them. Encourage exploration of the different sorts of marks and effects that charcoal can make.
7. Share the experiments and focus on the different types of marks made and effects. How were these smudgy marks made? How do you get a really fine line with the charcoal? What are some of the problems using charcoal?
8. You could set up a challenge for them using charcoal after this that could be a student initiated idea or some objects you would like them to draw. On old boot or something that lends itself to the medium of course.
9. The Jackson Pollock and Degas paintings are natural jumping off points for artistic discoveries as well.
10. Some artists who have used charcoal: Brett Whitely, Kathe Kollwitz, Willem De Kooning, Georges Braque, Rembrandt and I am sure hundreds more! Many artists who paint in oil draw with charcoal on canvas before they paint.
Comments, additional names of artists, anything will be appreciated!
Subscribe to:
Posts (Atom)